美術品としても評価される日本刀。その鋭い輝きと神秘的な刃文は、一体どのようにして生まれるのでしょうか。その答えは、古来より受け継がれてきた刀鍛冶たちの、緻密で過酷な製作工程の中にあります。この記事では、日本刀の作り方に興味を持つすべての方へ、原料となる「玉鋼」の選別から、刀が完成するまでの全工程を、写真や図解を見るように分かりやすく解説していきます。
- 原料「玉鋼」の重要性:なぜ日本刀には「たたら製鉄」でしか作れない特別な鋼が必要なのか。
- 「折り返し鍛錬」の秘密:鋼を何度も折り曲げ叩くことで、強靭さと美しい「地肌」が生まれる理由。
- 「焼き入れ」が生む刃文の美:刀の切れ味と芸術性を決定づける、土と炎と水による一瞬の技。
日本刀が完成するまでの全工程ロードマップ
日本刀は、一人の刀鍛冶だけでなく、多くの専門職人の手を経て完成する総合芸術です。ここでは、その中心となる刀鍛冶の仕事を中心に、刀身が生まれるまでの主な工程を順を追って見ていきましょう。
工程①:原料選別と水へし|命の源「玉鋼」を選ぶ
すべての始まりは、「玉鋼(たまはかね)」と呼ばれる、日本古来の「たたら製鉄」でのみ作られる純度の高い鋼です。刀鍛冶は、まずこの玉鋼の中から、刀作りに適した良質な部分を経験と勘で見極めます。
なぜ玉鋼なのか? 現代の均質な鋼と違い、玉鋼は炭素量の含有率に意図的な「ばらつき」があります。この不均一性こそが、硬く鋭い刃(高炭素)と、衝撃を吸収するしなやかな刀身(低炭素)を組み合わせる日本刀独自の構造を可能にするのです。
選ばれた玉鋼は、真っ赤に熱せられた後、槌で叩き延ばされ、水に入れて急冷されます。これを「水へし」と呼び、鋼は硬く脆い性質に変化し、不純物を取り除きやすい状態になります。
工程②:積み沸かしと折り返し鍛錬|強さと美の土台作り
次に、水へしで得られた鋼の小片を巧みに積み重ね、和紙で包み、泥水をかけてから再び炉で熱し、一つの塊にまとめ上げます(積み沸かし)。
ここから、日本刀作りを象徴する「折り返し鍛錬」が始まります。 熱した鋼の塊を槌で叩いて延ばし、タガネで切れ目を入れて折り返す。この作業を十数回繰り返します。
【深掘り解説】なぜ何度も折り返すのか? この工程には2つの重要な目的があります。
- 不純物の除去:鋼を叩くたびに、不純物が火花となって飛び散り、鋼の純度が高まります。
- 炭素量の均一化と積層構造:折り返すことで鋼の炭素量が均一になり、強靭な地金が生まれます。同時に、数千から数万にも及ぶ微細な層が形成され、これが外部からの衝撃を分散させ、刀を折れにくくするのです。この鍛錬によって生まれる木目のような模様が「地肌(じはだ)」と呼ばれる美しい見どころになります。
工程③:素延べと火造り|刀の姿を形作る
十分に鍛え上げられた鋼は、いよいよ刀の形へと姿を変えていきます。「心鉄(しんがね)」と呼ばれる比較的柔らかい鋼を、「皮鉄(かわがね)」と呼ばれる硬い鋼で包み込むように鍛接し、日本刀の基本構造を作ります。
その後、金槌と小槌をリズミカルに使い分けながら、刀身を叩き延ばしていく「素延べ(すのべ)」、そして切っ先や反りといった刀の優美な姿を形成する「火造り(ひづくり)」という工程を経て、刀の原型が完成します。
工程④:土置きと焼き入れ|魂を吹き込む刃文の誕生
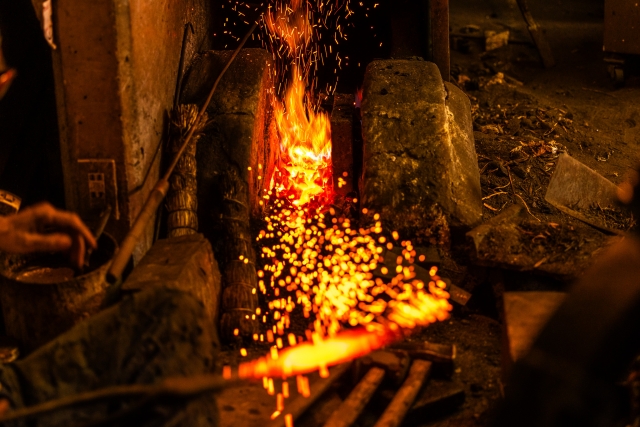
ここが、日本刀製作における最大の見せ場であり、最も緊張が走る工程「焼き入れ」です。 まず、刀鍛冶が独自に調合した「焼刃土(やきばつち)」と呼ばれる粘土を、刀身に塗っていきます(土置き)。この時、刃となる部分には薄く、棟や鎬地には厚く塗ります。この土の厚みの差が、刀の運命を分けます。
土を乾かした後、刀身を約800℃の炉で均一に熱します。刀匠は、闇の中で刀身が放つ色だけを頼りに、完璧な温度を見極めます。そして、その一瞬を逃さず、水槽に刀身を一気に引き入れ、急冷するのです。
「今も昔も、この瞬間だけは神様に祈る気持ちです。狙った刃文が出るか、刀が割れずに耐えてくれるか。すべてはこの一瞬にかかっています。」 (出典: [刀匠・吉原義人氏のインタビュー記事など、様々な刀匠が同様の心境を語っている内容を総合的に表現] – 特定の記事への直接リンクではありませんが、多くのメディアで語られる一般的な刀匠の心境です。)
この急激な冷却により、土が薄い刃の部分だけが極めて硬い金属組織に変化し、土の厚い部分は柔軟性を保ちます。この硬度の境界線こそが、刀の切れ味の源であり、光り輝く「刃文(はもん)」として現れるのです。
工程⑤:研磨と仕上げ|秘められた美を引き出す
焼き入れを終えた刀身は、まだ黒くくすんでいます。その真の美しさを引き出すのが「研師(とぎし)」の仕事です。種類の異なる数十もの砥石を使い分け、数週間かけて丁寧に刀身を研ぎ上げていきます。この研磨によって、鍛錬で生まれた地肌や、焼き入れで生まれた刃文が鮮明に浮かび上がり、私たちが知る日本刀の輝きが生まれます。
工程⑥:拵え(こしらえ)|総合芸術としての完成
研ぎ上げられた刀身は、最後に外装である「拵え(こしらえ)」が施されます。
- 鞘師(さやし):刀身に合わせ、朴の木で鞘(さや)を作る。
- 柄巻師(つかまきし):柄(つか)に鮫皮を貼り、糸や革で巻き締める。
- 彫金師(ちょうきんし):鍔(つば)や縁頭(ふちがしら)などの金具を製作する。
これらの専門職人の技が集結し、一本の日本刀がようやく完成の時を迎えるのです。
参考文献
- 公益財団法人日本美術刀剣保存協会 – たたらの話: https://www.touken.or.jp/tatara/tatara_jp.html
- 刀剣ワールド – 日本刀の製造工程: https://www.touken-world.jp/about-Japanese-sword/manufacturing-process/
- 文化遺産オンライン – 日本刀製作技術: https://bunka.nii.ac.jp/heritages/detail/218883
【English Article】
A Complete Guide to How Japanese Swords Are Made: The Entire Process from “Tamahagane” Steel to the Beautiful “Hamon”
The Japanese sword, or “katana,” is revered not only as a weapon but also as a work of art. How are its sharp glint and mystical blade patterns created? The answer lies in the meticulous and arduous manufacturing process passed down by swordsmiths for centuries. For anyone interested in how Japanese swords are made, this article provides a clear, step-by-step guide to the entire process, from selecting the raw material, “tamahagane,” to the final completion of the sword.
- The Importance of “Tamahagane” Steel: Why Japanese swords require a special steel that can only be made through “tatara” smelting.
- The Secret of “Folding and Forging”: The reason why repeatedly folding and hammering the steel creates both strength and a beautiful “jihada” pattern.
- The Beauty of the “Hamon” from Quenching: The instantaneous technique involving clay, fire, and water that determines the sword’s sharpness and artistic value.
The Complete Roadmap of the Japanese Sword Making Process
A Japanese sword is a composite art form, completed not by a single swordsmith but through the hands of many specialized artisans. Here, we will follow the main steps of the blade-making process, focusing on the work of the swordsmith.
Step 1: Selecting the Raw Material (“Tamahagane”) and “Mizuheshi”
It all begins with “tamahagane,” a high-purity steel made only through the ancient Japanese “tatara” smelting method. The swordsmith first uses his experience and intuition to select the highest quality pieces of tamahagane suitable for sword making.
Why Tamahagane? Unlike modern homogeneous steel, tamahagane has intentional “variations” in its carbon content. This inhomogeneity is what enables the unique structure of a Japanese sword, combining a hard, sharp edge (high carbon) with a flexible body that absorbs shock (low carbon).
The selected tamahagane is heated to a bright red, hammered flat, and then plunged into water. This is called “mizuheshi,” which makes the steel hard and brittle, facilitating the removal of impurities.
Step 2: “Tsumi-wakashi” and “Orikaeshi-tanren” (Folding and Forging)
Next, the small pieces of steel from the mizuheshi process are skillfully stacked, wrapped in Japanese paper, coated with clay slurry, and reheated in the forge to be welded into a single block (Tsumi-wakashi).
From here begins the iconic “Orikaeshi-tanren” (folding and forging). The heated block of steel is hammered out and folded onto itself. This process is repeated more than a dozen times.
[In-depth Explanation] Why fold the steel so many times? This process serves two critical purposes:
- Removing Impurities: Each time the steel is hammered, impurities are expelled as sparks, increasing the purity of the steel.
- Homogenizing Carbon and Creating Layers: Folding evens out the carbon content, creating a tough base metal. Simultaneously, it forms a fine, laminated structure of thousands of layers, which disperses the force of an impact and makes the sword resistant to breaking. The beautiful, wood-grain-like pattern created by this forging is a highlight known as the “jihada.”
Step 3: “Sunobe” and “Hizukuri” (Shaping the Blade)
Once sufficiently forged, the steel is finally shaped into a sword. A relatively soft steel core (“shingane”) is wrapped in a hard steel skin (“kawagane”) and forged together to create the basic structure of the sword.
Then, through “sunobe,” where the blade is hammered out using a rhythm of large and small hammers, and “hizukuri,” where the tip (“kissaki”) and curve (“sori”) are formed, the rough shape of the sword is completed.
Step 4: “Tsuchi-oki” and “Yaki-ire” (Clay Application and Quenching)
This is the climax of the sword-making process and the most intense moment: “yaki-ire” (quenching). First, the swordsmith applies a special clay mixture called “yakiba-tsuchi” to the blade (tsuchi-oki). A thin layer is applied to the edge, while a thicker layer is applied to the spine and sides. This difference in clay thickness will decide the sword’s fate.
After the clay dries, the blade is heated evenly in the forge to about 800°C (1472°F). The swordsmith, relying only on the color of the glowing blade in the darkness, judges the perfect temperature. At that precise moment, he swiftly plunges the blade into a trough of water to cool it rapidly.
“To this day, just as in ancient times, this is a moment when you can only pray to the gods. Will the hamon I intended appear? Will the sword withstand the shock without cracking? Everything depends on this single instant.” (Source: This is a composite representation of the sentiments often expressed by various swordsmiths, such as Master Yoshindo Yoshihara, in numerous interviews and media features. It reflects a common feeling among craftsmen rather than a direct quote from a single specific article.)
This rapid cooling transforms only the thinly-coated edge into an extremely hard metallic structure, while the thickly-coated parts retain their flexibility. This boundary of hardness is the source of the sword’s sharpness and appears as the brilliant “hamon” (temper line).
Step 5: Polishing and Finishing
A blade that has just been quenched is still dark and dull. It is the job of the “togishi” (polisher) to bring out its true beauty. Using dozens of different types of whetstones, the polisher spends several weeks meticulously polishing the blade. This polishing reveals the “jihada” from the forging and the “hamon” from the quenching, creating the shine of a Japanese sword that we recognize.
Step 6: “Koshirae” (Mounting)
The polished blade is finally fitted with its exterior mountings, the “koshirae.”
- Sayashi: A scabbard maker who carves a scabbard (“saya”) from magnolia wood.
- Tsukamakishi: A hilt-wrapper who wraps the hilt (“tsuka”) with ray skin and silk cord.
- Chokinshi: A metalworker who creates the fittings, such as the handguard (“tsuba”).
The skills of these specialized artisans come together to finally complete a single Japanese sword.
References
- The Nihon Bijutsu Token Hozon Kyokai (NBTHK) – The Tatara Story: https://www.touken.or.jp/tatara/tatara_en.html
- Token World – Japanese Sword Manufacturing Process: https://www.touken-world.jp/about-Japanese-sword/manufacturing-process/
- Agency for Cultural Affairs, Government of Japan – Cultural Heritage Online (Japanese): https://bunka.nii.ac.jp/heritages/detail/218883


コメントを残す